
By Samantha Goodin
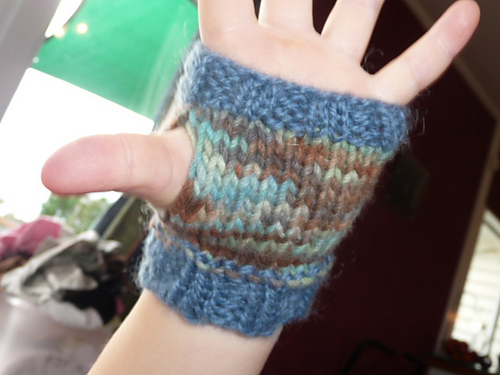
This is a quick basic knit pattern to fit 1 - 5 year olds and can be easily adapted to ones uniqueness with addition of different colour yarns, cables, increasing ribbing / stocking stitch length, embellishments or addition of different stitches. It can either be knit in the round or flat then seamed and what better way to use up extra bits of yarn, or keep the kids that extra bit warm in winter.
This is the first pattern that I have put together so all feedback is appreciated,
k = Knit
p = Purl
sts = Stitches
sm = Stitch Marker
Needle Size: 4mm
Yarn: 20 grams 8 ply
1 Stitch Marker required when knitting in the round
Gauge: 5.5 stitches and 7 rows
= 1 inch in Stocking Stitch
Instructions for knitting in the Round:
On either DPN’s or Magic Loop
Cast on 28 sts (Cable or Long Tail cast on) (in contrast colour)
Place stitch marker, Join in round
Row 1: [k 2, p 2] continue in pattern to sm
Row 2 - 7: Repeat row 1 to establish ribbing band
Row 8: p all sts
Row 9 - 13: k all sts (in main colour)
Row 14: k to sm, turn work
Row 15: p back across row to sm (to make thumb gap)
Row 16: k to sm, turn work
Row 17: p back across row to sm
Row 18: k all sts
Row 19: k all sts(this row closes the thumb gap)
Row 20: k all sts (in contrast colour)
Row 21: p all sts
Row 22: [k 2, p 2] continue in pattern to sm
Row 23 - 26: Repeat row 22 to establish ribbing band
Row 27: Cast off in pattern
Tie in ends
Then repeat for 2nd Hand Warmer

Instructions for Knitting Flat:
Then seam to create Hand Warmer
Cast on 28 sts (Cable or Long Tail cast on) (in contrast colour)
Row 1: [k 2, p 2] continue in pattern to end
Row 2 - 8: repeat row 1
Row 9: k all sts
Row 10: k all sts (in main colour)
Row 11: p all sts
Row 12 - 20: repeat rows 10 & 11 (using contrast colour on row 20)
Row 21: k all sts
Row 22: [k 2, p2] continue in pattern to end
Row 23 - 26: repeat row 22
Row 27: Cast off in pattern
Use tail yarns to sew edge seam, leaving a 6 row gap for the thumb between rows 12 - 17
Tie in ends
Then repeat for 2nd Hand Warmer
© This pattern is published in recognition of My Nana Brown, whom is my inspiration in knitting and I know it has been a joy for her to see her great grandchildren wearing this design.
Samantha Goodin @ http://samssnips.blogspot.com/
Thank you for respecting this.
2 comments:
I know this is a *really* old post, but for the knitted flat instructions, I've simplified them a little for ease of reading: (Sorry for the deleted comment, I realised I made a mistake so I redid it.)
Abbreviations: k = knit, p = purl, sts = stitches, rep = repeat, cont = continue, CO = cast on, BO = bind off, St st = stockinette stitch, MC = main colour, CC = contrast colour,
Gauge: 22st x 28 rows = 4 inches in stockinette stitch. Following OP's gauge is also acceptable if you're short on time.
MAKE SURE TO CHECK YOUR GAUGE AND ADJUST NEEDLE SIZE ACCORDINGLY.
Worked Flat Kid's Fingerless Gloves Pattern (Make 2)
CO 28st using CC using cable or long tail method, leaving enough yarn to sew seam.
Rows 1-8: k2, p2, rep til end of row.
Row 9: k all sts.
Row 10: Switch to MC, k all sts.
Rows 11-19: Start knitting in St st, starting and ending on a purl row.
Row 20: Switch to CC, k all sts.
Row 21: k all sts
Rows 22-26: k2, p2, rep til end of row.
BO in pattern (knitwise for k sts, purlwise for p sts), Leaving a long tail to sew seam.
Place markers (if it helps) at the 12th and 17th rows so you know where to stop sewing for the thumb gap.
Use tails to sew seams. If you used markers, sew until the markers from both sides. If not, leave a 6 row gap between rows 12-17 for the thumb gap. Weave in any extra ends.
I hope that's correct, that was my first time trying to do that.
Anyway, happy knitting!
- Rosalie
Post a Comment